Tool: houseHole – Private disposable email
Househole
Househole is a self-hosted solution designed to centralize your trashmail, disposable-emails or temporary email services, offering a robust alternative to public temporary email providers. Househole prioritizes privacy, security, and control, while helping users remain undetected by services that identify temporary emails.
Contents
Key Features
- Self-Hosted Privacy: Complete control over your email services. All data remains within your infrastructure / hosting.
- Undetectable Temporary Emails: Househole helps bypass (almost all) temporary email detection systems, such as those employed by services like Proxycurl, check by yourself.
- Data Recovery: Centralized management allows you to retain control of your temporary emails, which is useful if you ever need to recover accounts created with them.
- Security from Leaks: Public trashmail services can expose sensitive information. Househole mitigates this risk by providing a private alternative.
Why Househole?
Temporary email services are essential for maintaining Privacy online. However, many websites have learned to block these services to prevent abuse. Furthermore, public temporary email providers can leak critical data, as a result of temporary emails used in testing during a development, or accounts created using temporary emails that continue to be used over time and could cause account takeovers, leading to security breaches.
Househole offers a self-hosted solution, helping users:
- Register for websites that block temporary emails, without exposing their primary email addresses.
- Avoid using public services where emails are exposed, and data can be compromised.
- Control the email data used for registrations, ensuring it’s recoverable in cases of account recovery.
Installation Guide
Househole is easy to install and can be hosted on your own server or computer.
Repo: https://github.com/TheCyberpunker/houseHole
Requirements:
- Node.js (for manual setup)
- A main domain and several secondary domains for managing your email service.
Steps:
- Clone the repository:
git clone https://github.com/TheCyberpunker/houseHole.git
cd houseHole
- Install dependencies:
curl -o- https://raw.githubusercontent.com/nvm-sh/nvm/v0.40.1/install.sh | bash
source ~/.bashrc
- Verify that nvm is installed:
nvm -v
nvm install 22.8.0
- Verify the installation:
node -v
npm -v
- Build and start the application:
npm install
npm run dev
- Access Househole through your browser:
http://localhost:3000
Configuration
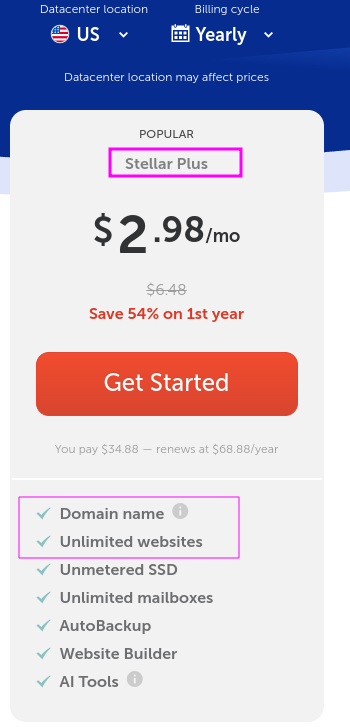
My configuration is as follows, I have the following hosting plan on namecheap, but it is not sponsored, I choose it because I have had good experience using their services.
You can buy very cheap domains to use for your temporary emails.
In this example, you have to go to domains > beast mode
Direct link: https://www.namecheap.com/domains/registration/results/?type=beast&domain=
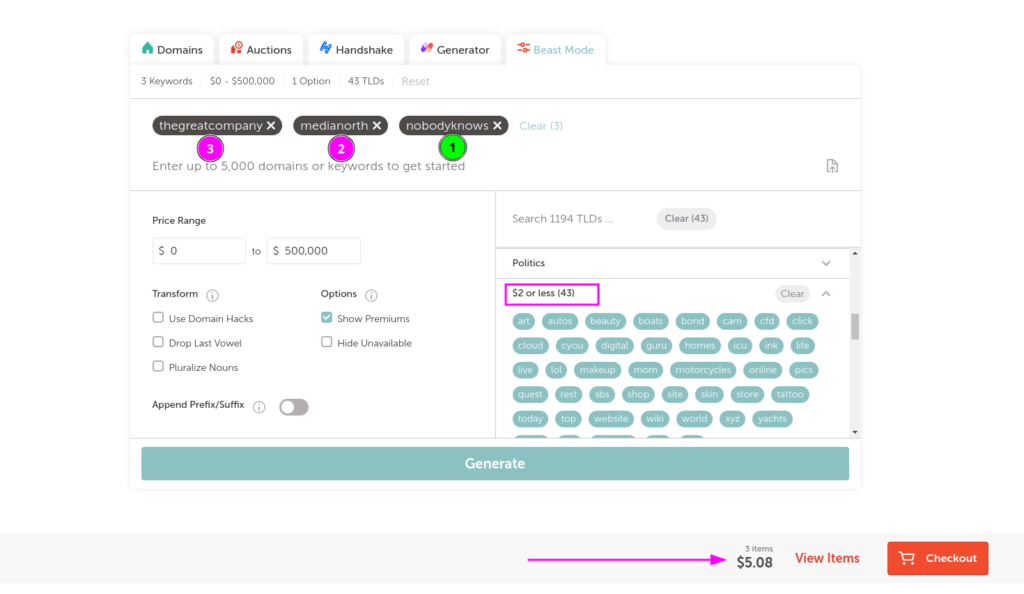
In this example I bought 3, one will be the main domain that will receive all the temporary emails,
the other two will be domains for the temporary emails
- nobodyknows.site – Main
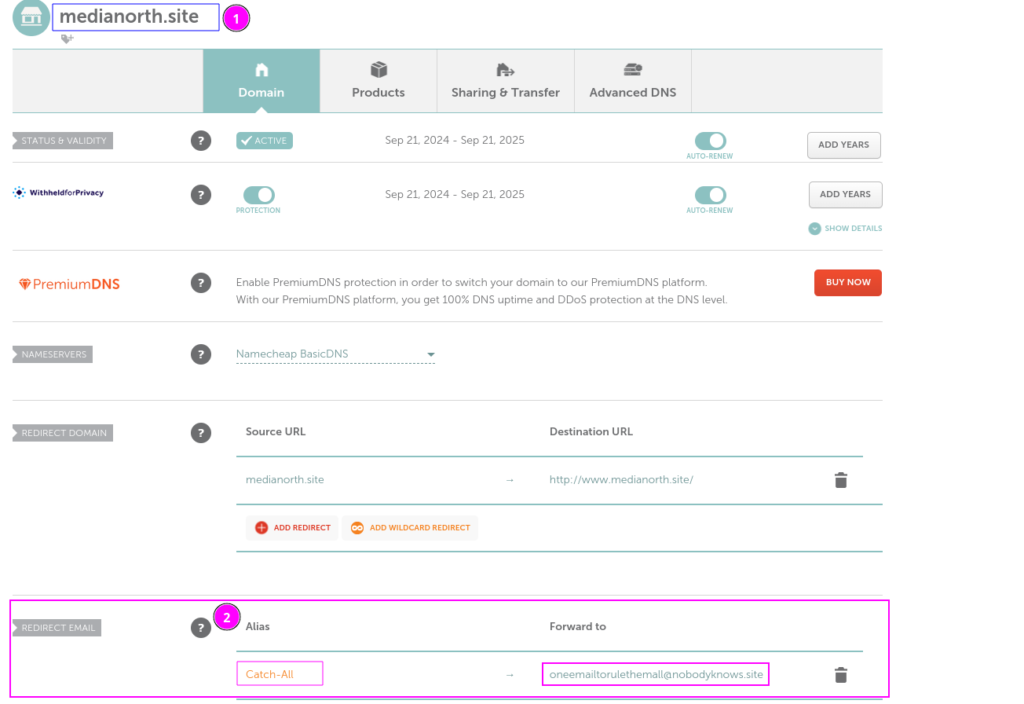
- medianorth.site – for temp mail
- thegreatcompany.site – for temp mail
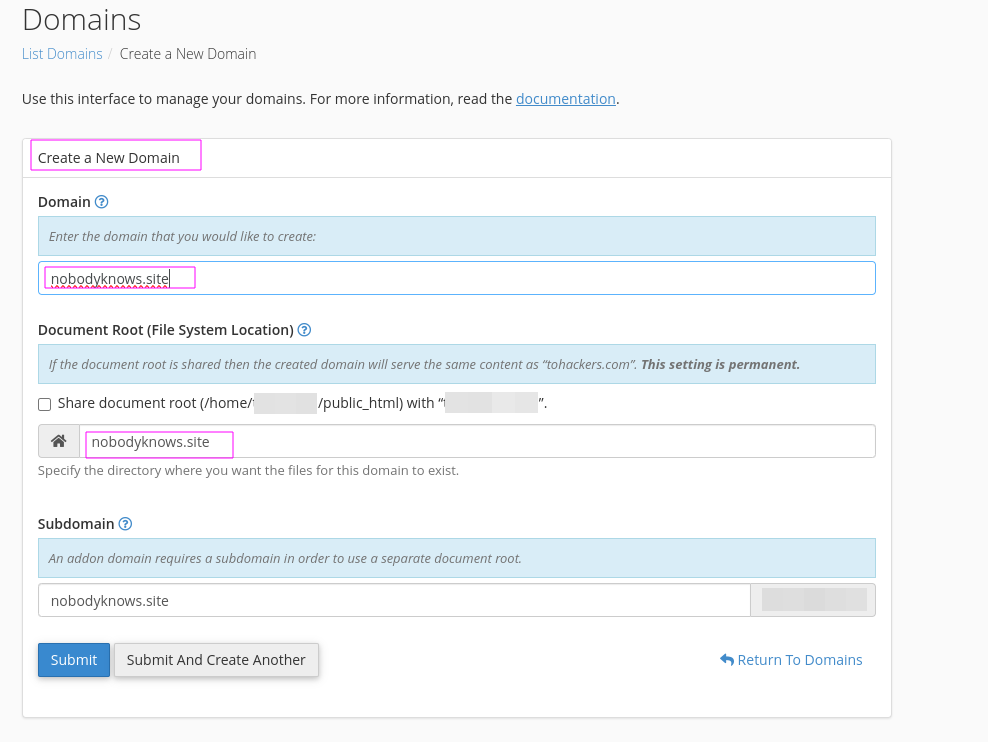
After purchasing the domains, you will choose the main domain in this example it will be nobodyknows.site
and you will add it as a new domain within your hosting Cpanel.
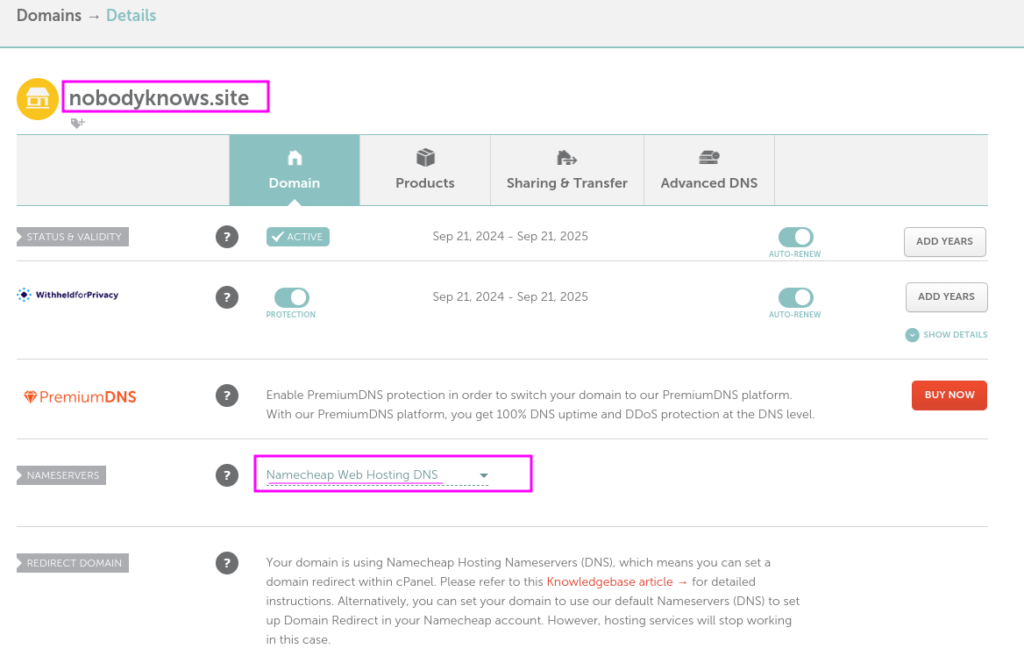
It is important to configure the main domain in nameservers as NameCheapWebHostingDNs
Now it is necessary to create a single primary email account, where all temporary emails will arrive.
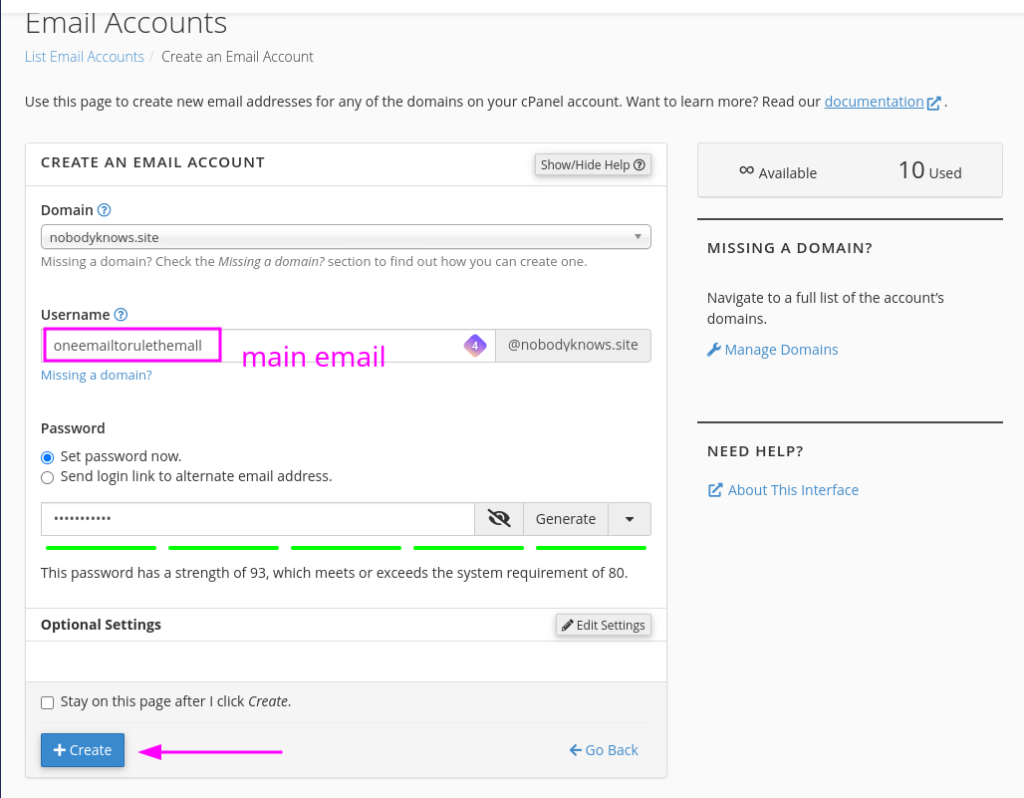
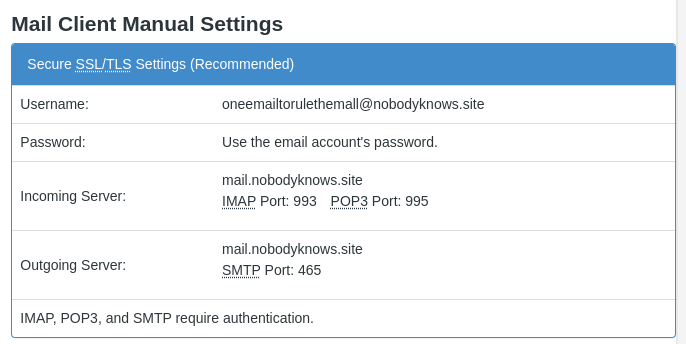
You need to keep your email address and password safe because they will be needed for the application’s environment variables file.
You will also need the automatic configuration data that the email gives you at the time of creation.
Now we will configure our domains to work for temporary emails, what is really done is to Add Catch-All rule so that all emails sent to this temporary domain arrive at the main email that we initially created.
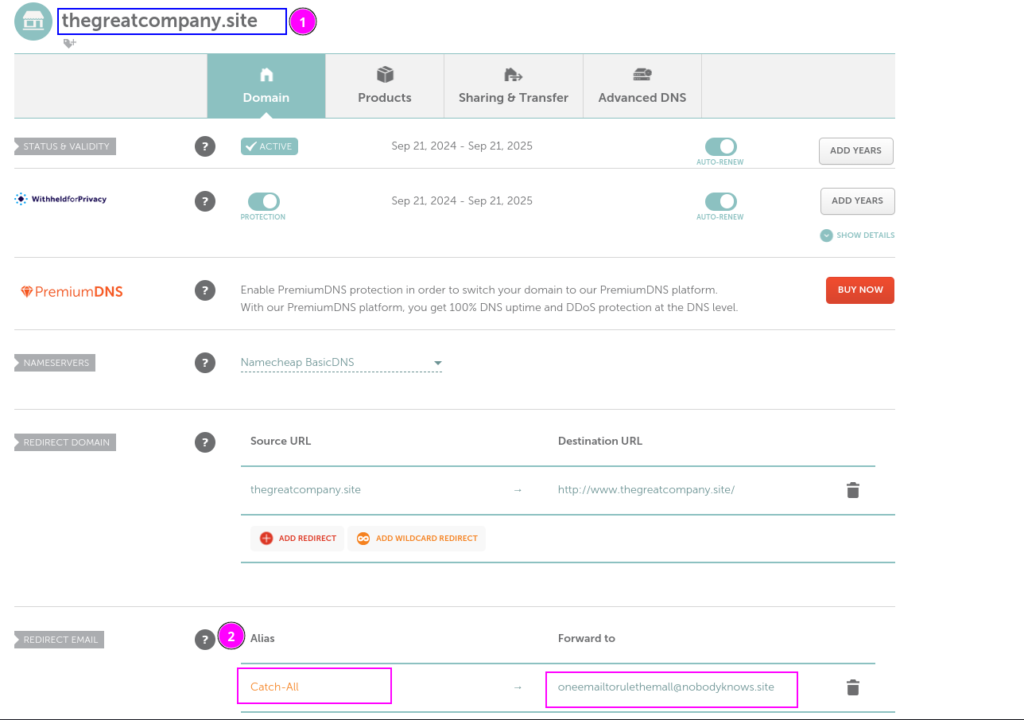
You can do the same with all the domains you wish to purchase for temporary emails.
Now, if you skipped the installation part, just go back to that point and download and install the tool.
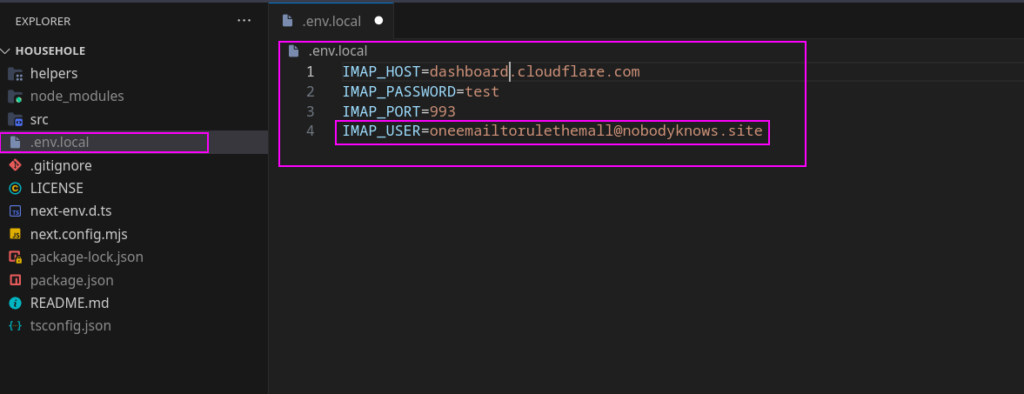
And in this part you must configure the .env.local file
with your IMAP data to make the connection.
Edit the .env.local file or create a new one in the root directory of househole with your email IMAP settings.
- example:
IMAP_HOST=imap.digitalocean.com
IMAP_PASSWORD=example123_123*
IMAP_PORT=993
[email protected]
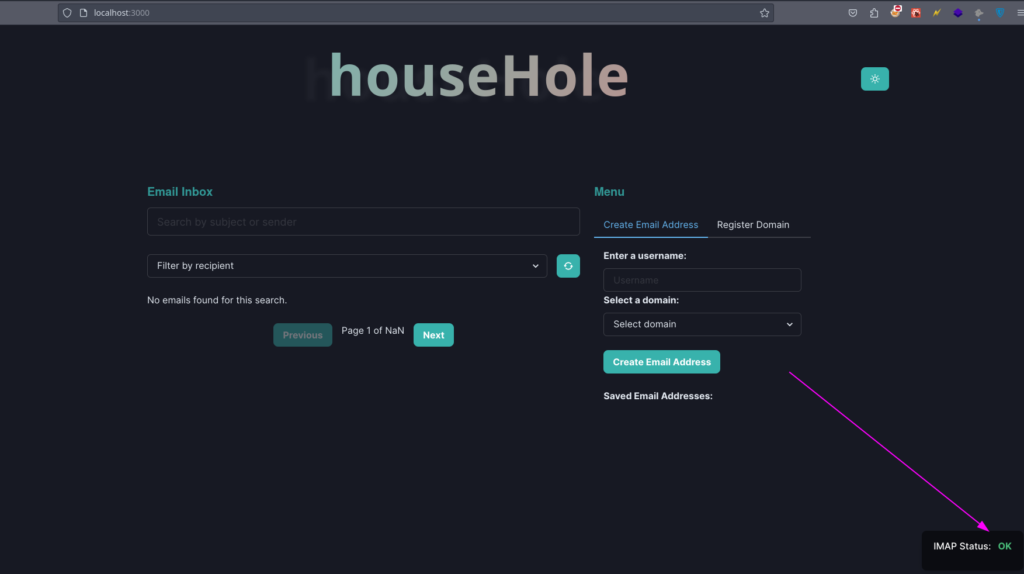
After you have this data correct, run the application
npm run devIf everything is correct, you will be able to see an OK at the bottom right, indicating that the connection with IMAP is successful.
Menu uses
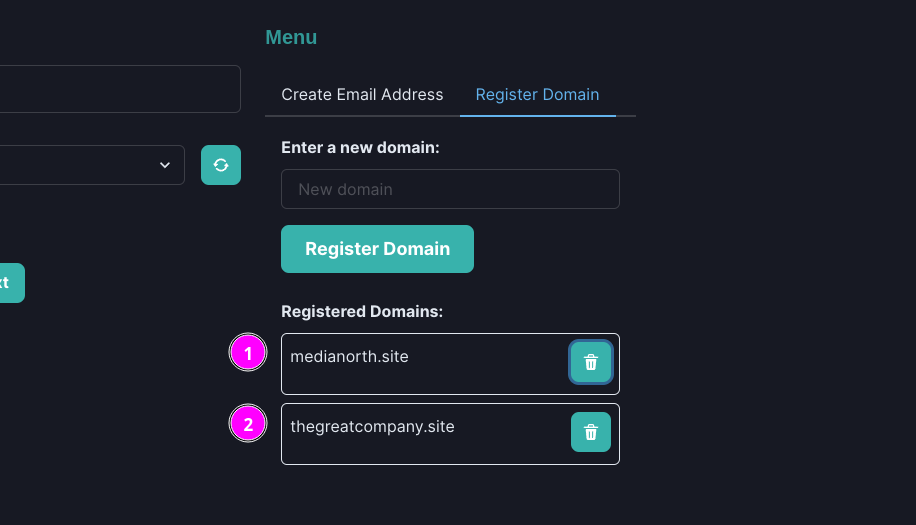
In the domain registration section, you will add the purchased domains to act as temporary emails.
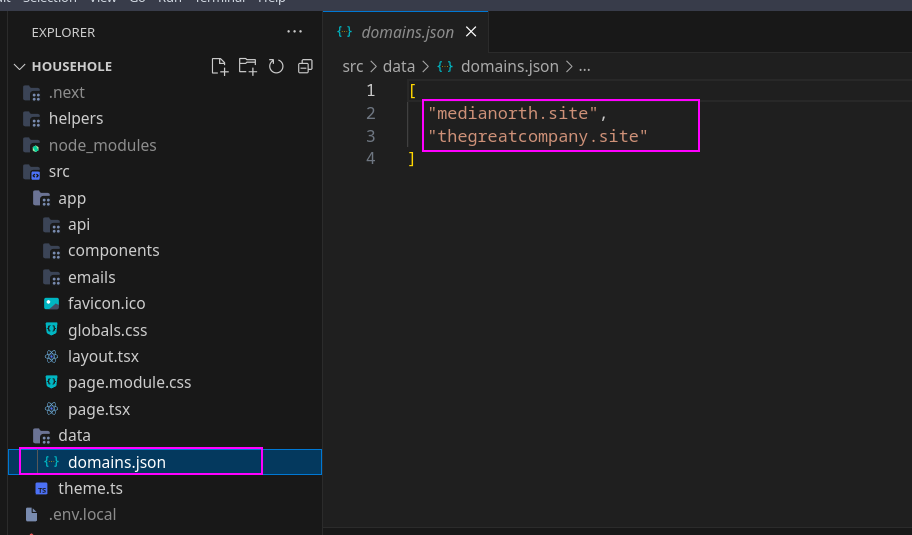
or you can do it manually
Now we are going to create an alias or temporary email address with the domain, it can be any name or alias.
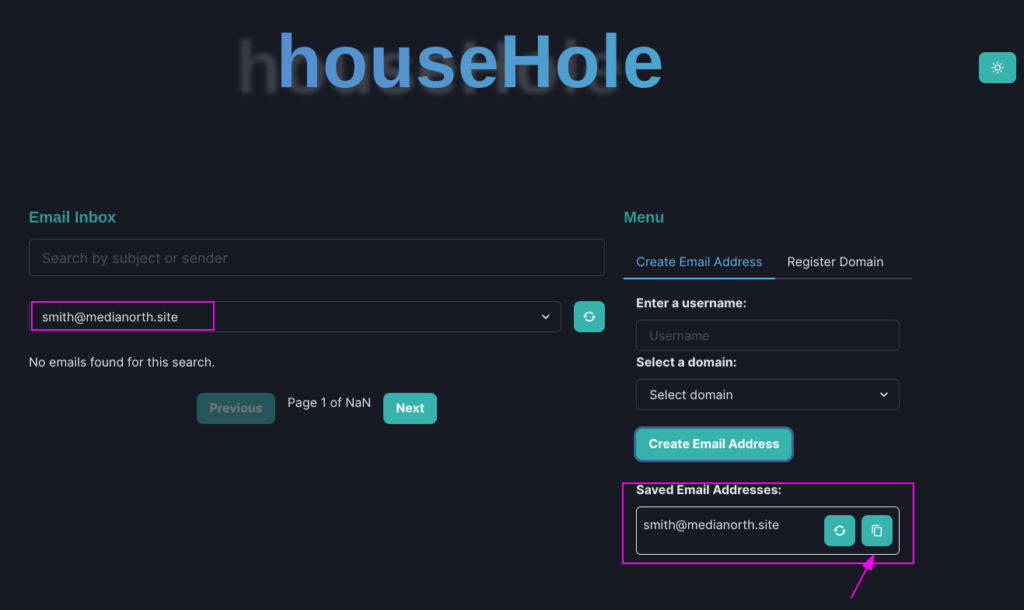
Let’s verify that it is not an email detected as a temporary email.
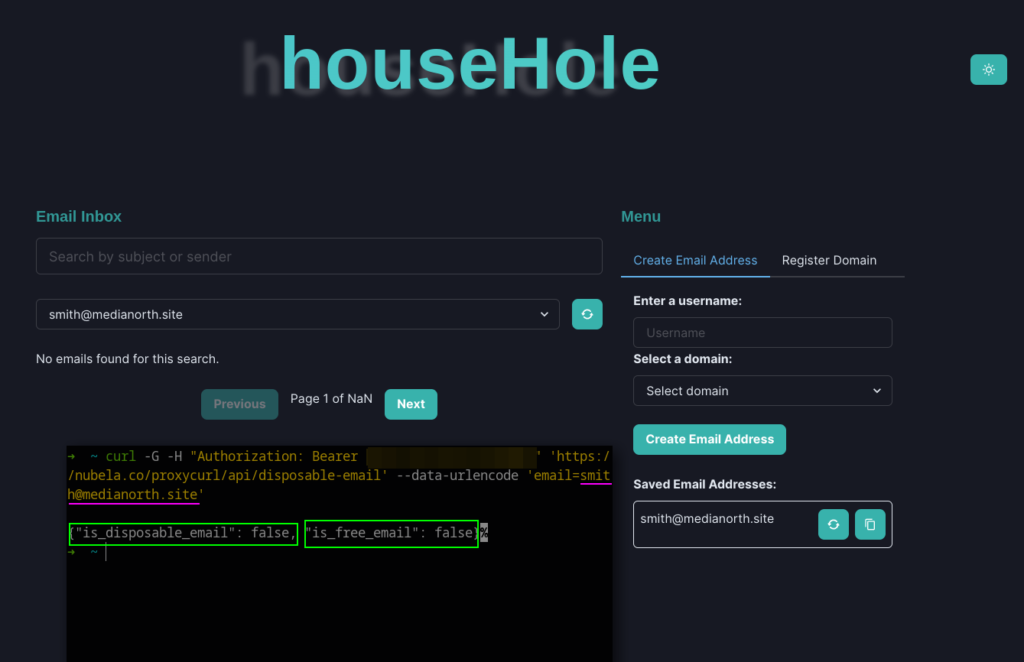
Now we test it with some service that verifies emails.
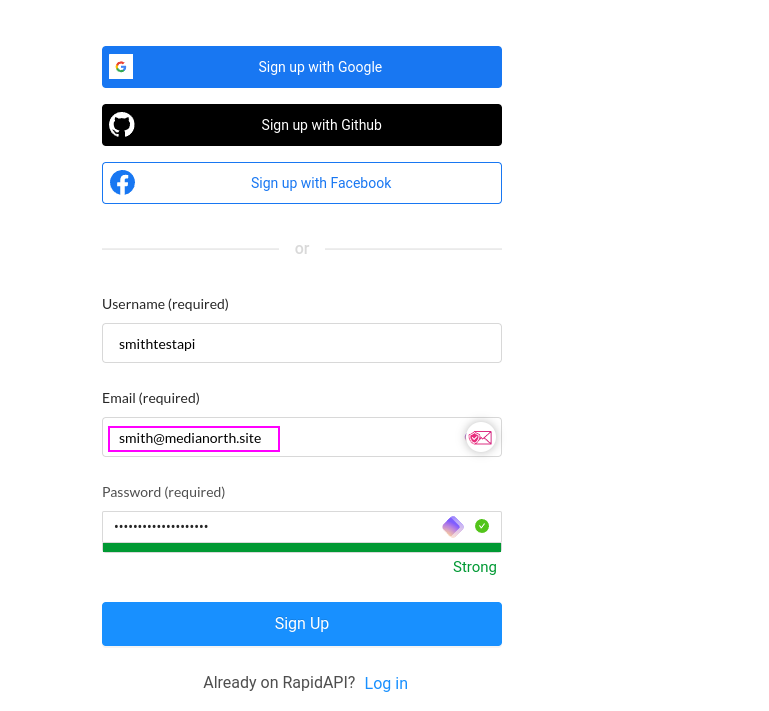
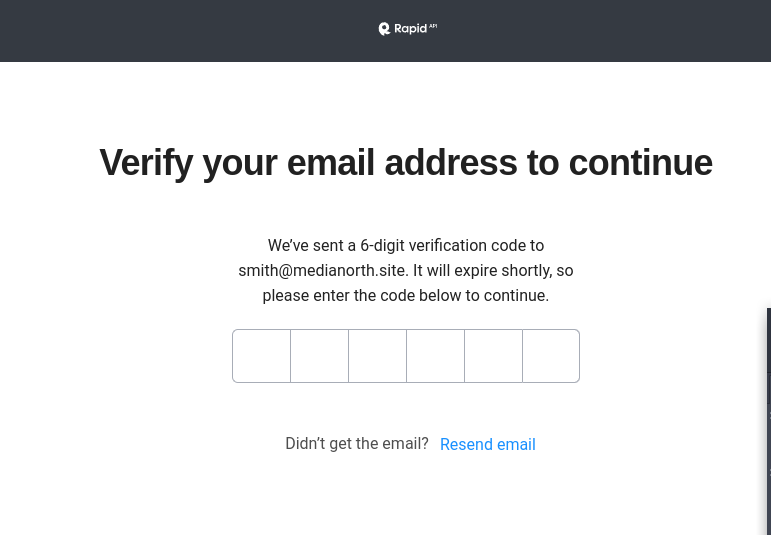
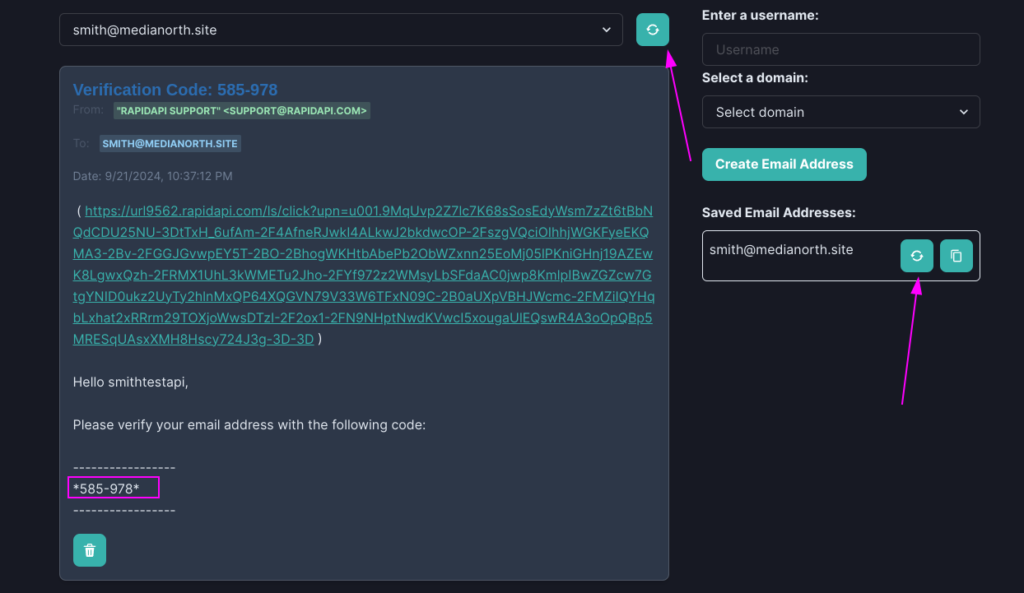
and everything worked correctly.
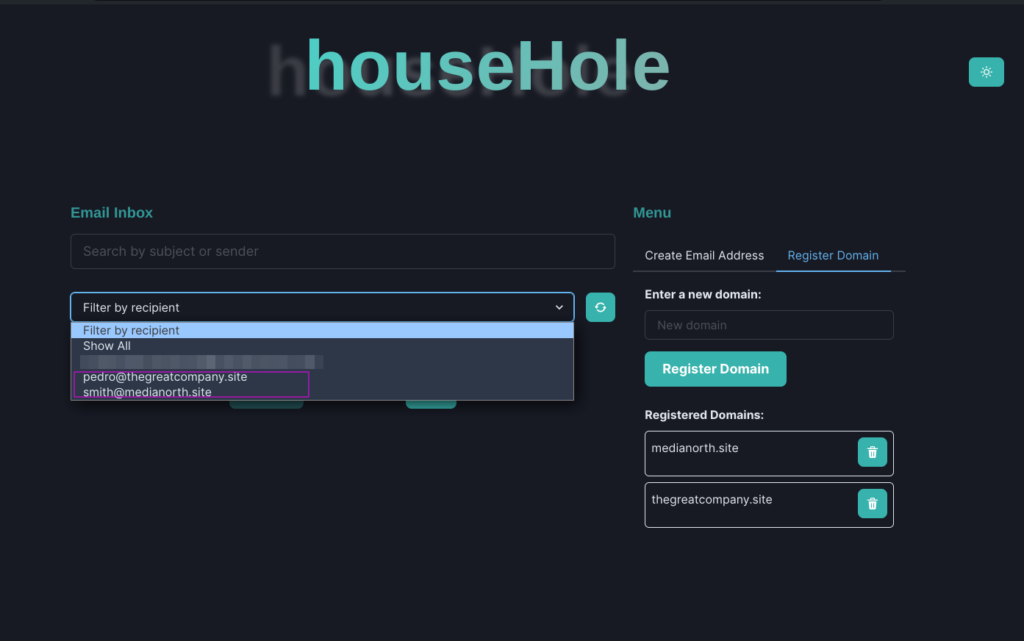
Additionally, we can also filter by email.
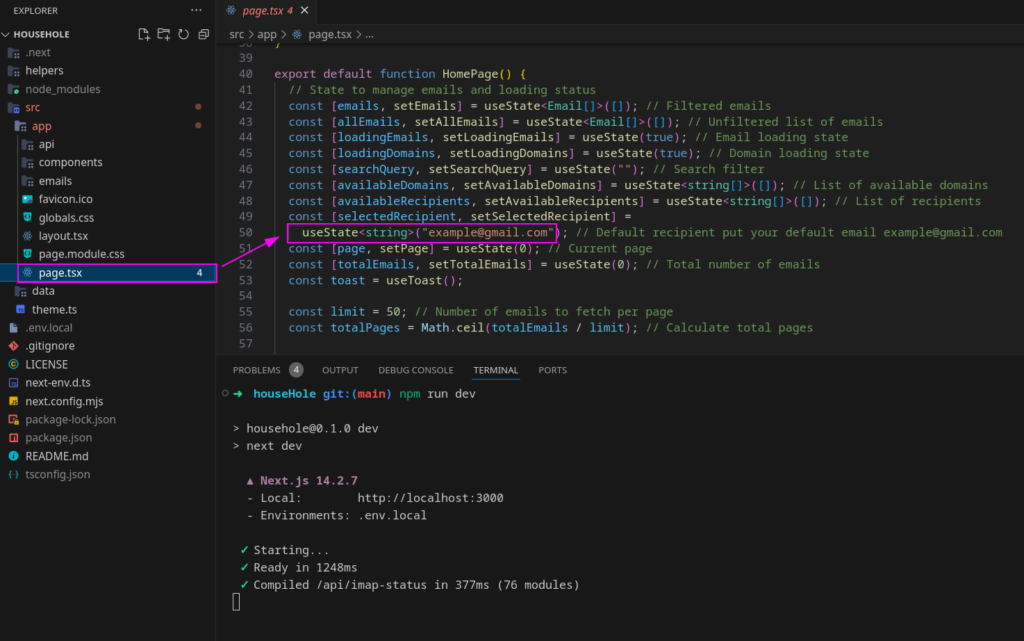
If at any time you decide that when opening the application it loads by default a specific email inbox, modify this file.
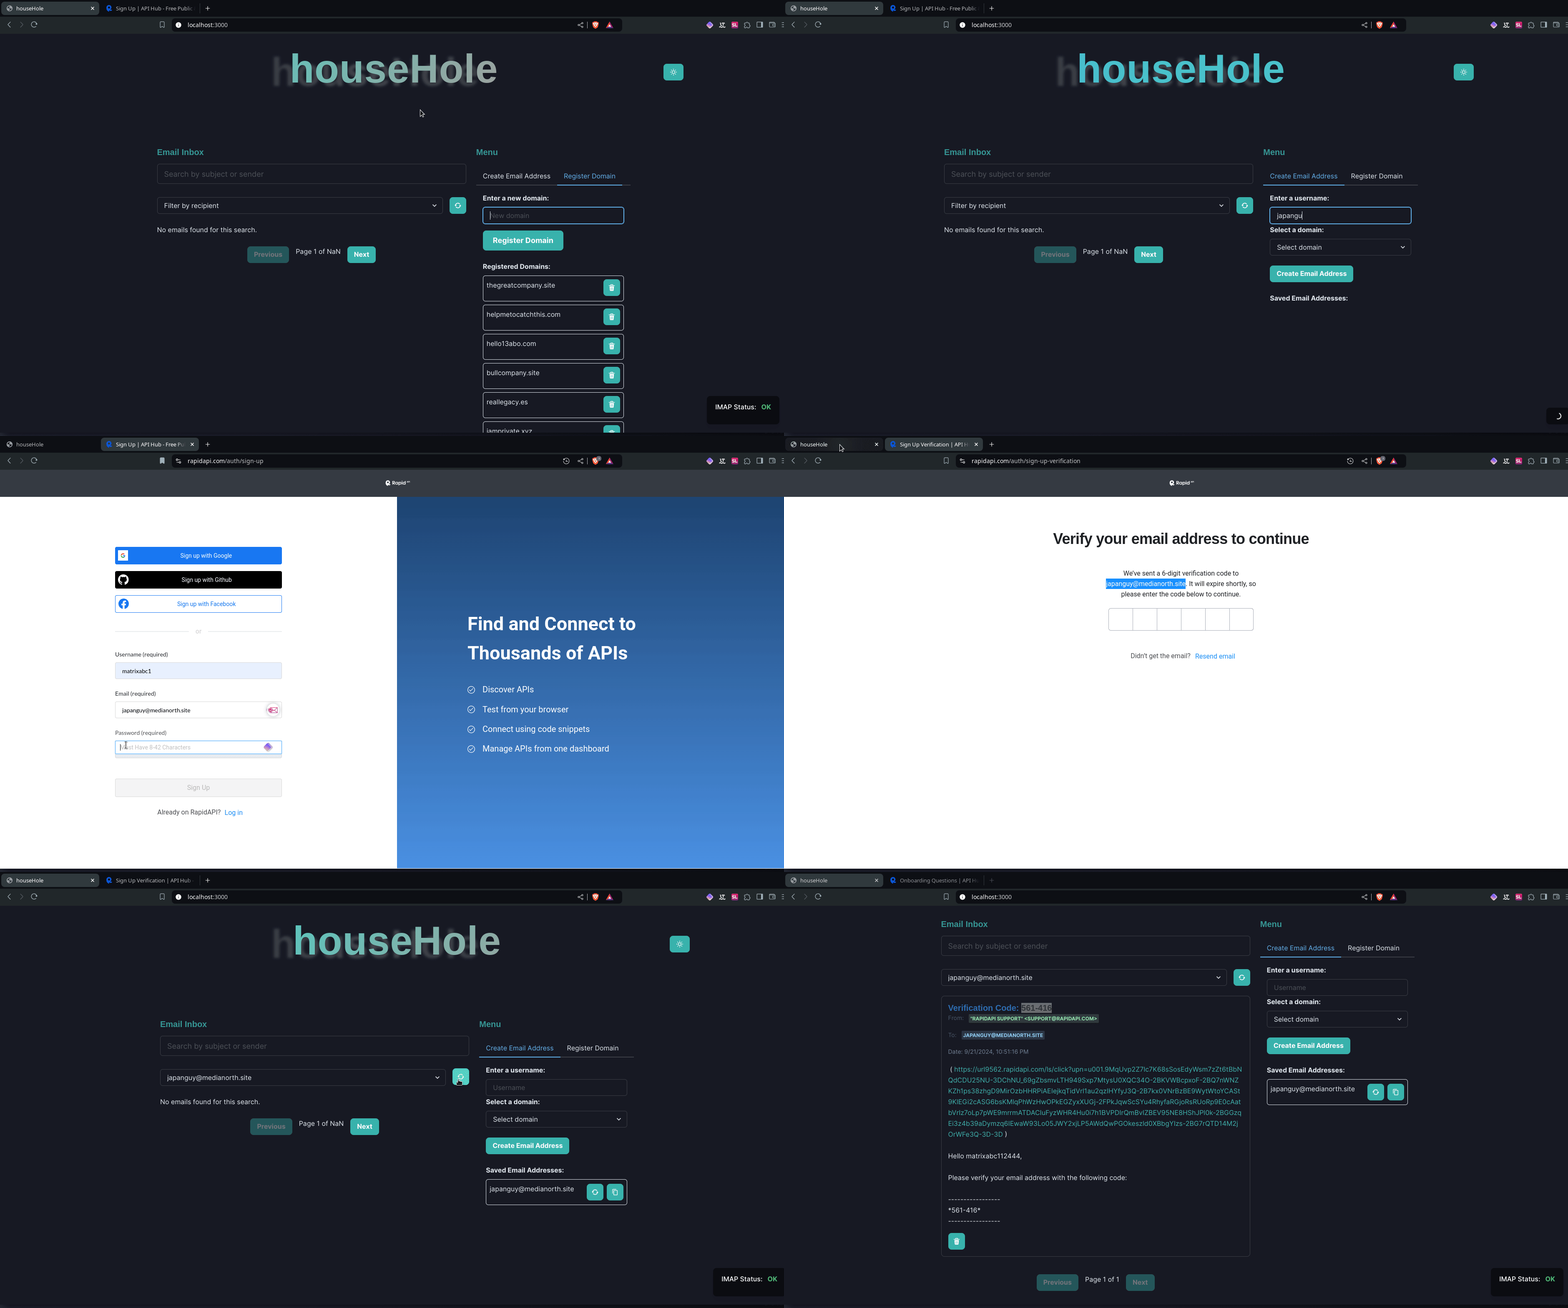
Video Demo:
Currently, this app does not have a public demo, because it would lose the meaning of what a private temporary email is. The idea behind all this is that each one can deploy their own service if they so require.
Usage
Househole provides a simple dashboard for managing your temporary email addresses. The dashboard allows you to:
View incoming emails: All received emails are displayed in the admin panel. Organize and manage your data: You can sort, filter, and delete emails as needed. Recover important accounts: All temporary emails are stored securely and can be accessed later for account recovery purposes.
Househole comes with two main views to manage your temporary email service efficiently:
1. Email Management View:
- View a list of all received emails.
- Search and Filter: Easily search through your received emails and filter them by email address.
- View detailed information about each email, including the sender, subject, and content.
2. Domain Management and Email Creation:
- On the right-hand menu, you can:
- Add Domains: Add domains you own or purchase new ones (on your server or hosting provider) to use for your email service.
- Create Emails: Generate new temporary email addresses on the fly.
- Copy to Clipboard: Conveniently copy newly created email addresses to your clipboard for quick use
Evasion from Temporary Email Detection
Many services use API requests to check if an email belongs to a temporary provider. Househole is built with this in mind. By hosting your own service and configuring it properly, you can go unnoticed by detection services. Make sure to:
- Configure your domain to avoid appearing on temporary email blacklists.
- Regularly update your imap settings to stay ahead of detection services.
- Rotate or add new domains.
Advantages of Househole
Privacy and Security: Unlike public trashmail services, with Househole use locally, or properly secured your temporary emails are never exposed to third parties. Undetectable (Not Always): Househole’s design makes it possible to use temporary emails even on services that typically block them. Data Control: Store, manage, and recover temporary emails used for account registrations, giving you long-term control. No Dependency on Public Services: As a self-hosted solution, you don’t rely on third-party services for your email privacy (Clarification: You need a service provider for the hosting, domains and imap accounts, but one that you can manage yourself).
Can it be improved?
Integration with multiple domain support for even greater flexibility. Advanced spam filtering to reduce unwanted email traffic. Enhanced user management to allow multi-user environments with role-based access.
Disclaimer
This project is something I developed to meet a personal need, and I won’t be providing any support for it. However, I believe it could be useful to others. Feel free to download, copy, fork, or modify it as you see fit, but please understand that I won’t be able to offer help with issues or improvements.
This project is developed for educational purposes only, and I am not responsible for any misuse of the tool. Please use it responsibly and in accordance with all applicable laws and regulations.
Vulnerabilities
Please do not search for vulnerabilities in this project. I haven’t implemented input validation or many other security aspects, so there are likely to be vulnerabilities. However, this project is not designed for rigorous testing or production-level deployment. If you’re looking for projects to explore security flaws, I recommend looking for larger, more sustainable projects with active contributors and community support. This is a small personal project with limited scope and doesn’t warrant security scrutiny.
Licence
This project is licensed under the MIT License. See the LICENSE file for more details.
Househole: Stay secure, stay private, stay undetected.


